

Clean records with a soft brush, a vinyl-safe cleaning solution, and gentle strokes that follow the grooves. Handle each disc by its edge and label, and keep household cleaners away from the playing surface. Knowing how to properly care for and clean vinyl records also means cleaning the stylus carefully with a purpose-made brush.
It’s natural to want a quick fix for dust, fingerprints, or playback noise. But the right approach is controlled, not aggressive: remove loose particles first, use products made for records, and avoid pressing dirt deeper into the grooves. Small habits help protect both the record and the sound it carries.
This guide covers safe handling, routine and deeper cleaning, suitable product choices, storage, and stylus care. You’ll learn how to brush a record, when to use cleaning fluid, and what to avoid. Together, these steps form a clear routine for keeping your collection ready to play.
Key Takeaways
- Choose an inner sleeve that helps shield records from dust and static between plays.
- Keep fingers off the playing surface, and guide cleaning strokes along the grooves.
- Use products made for vinyl, and avoid household cleaners that can harm the record surface.
- Care for your stylus with a purpose-made brush and a gentle, deliberate touch.
How to Clean Vinyl Records?
Learning how to properly care for and clean vinyl records starts with removing loose dust before deeper cleaning. Household cleaners, heavy pressure, and strokes against the grooves can damage the surface or affect sound quality.
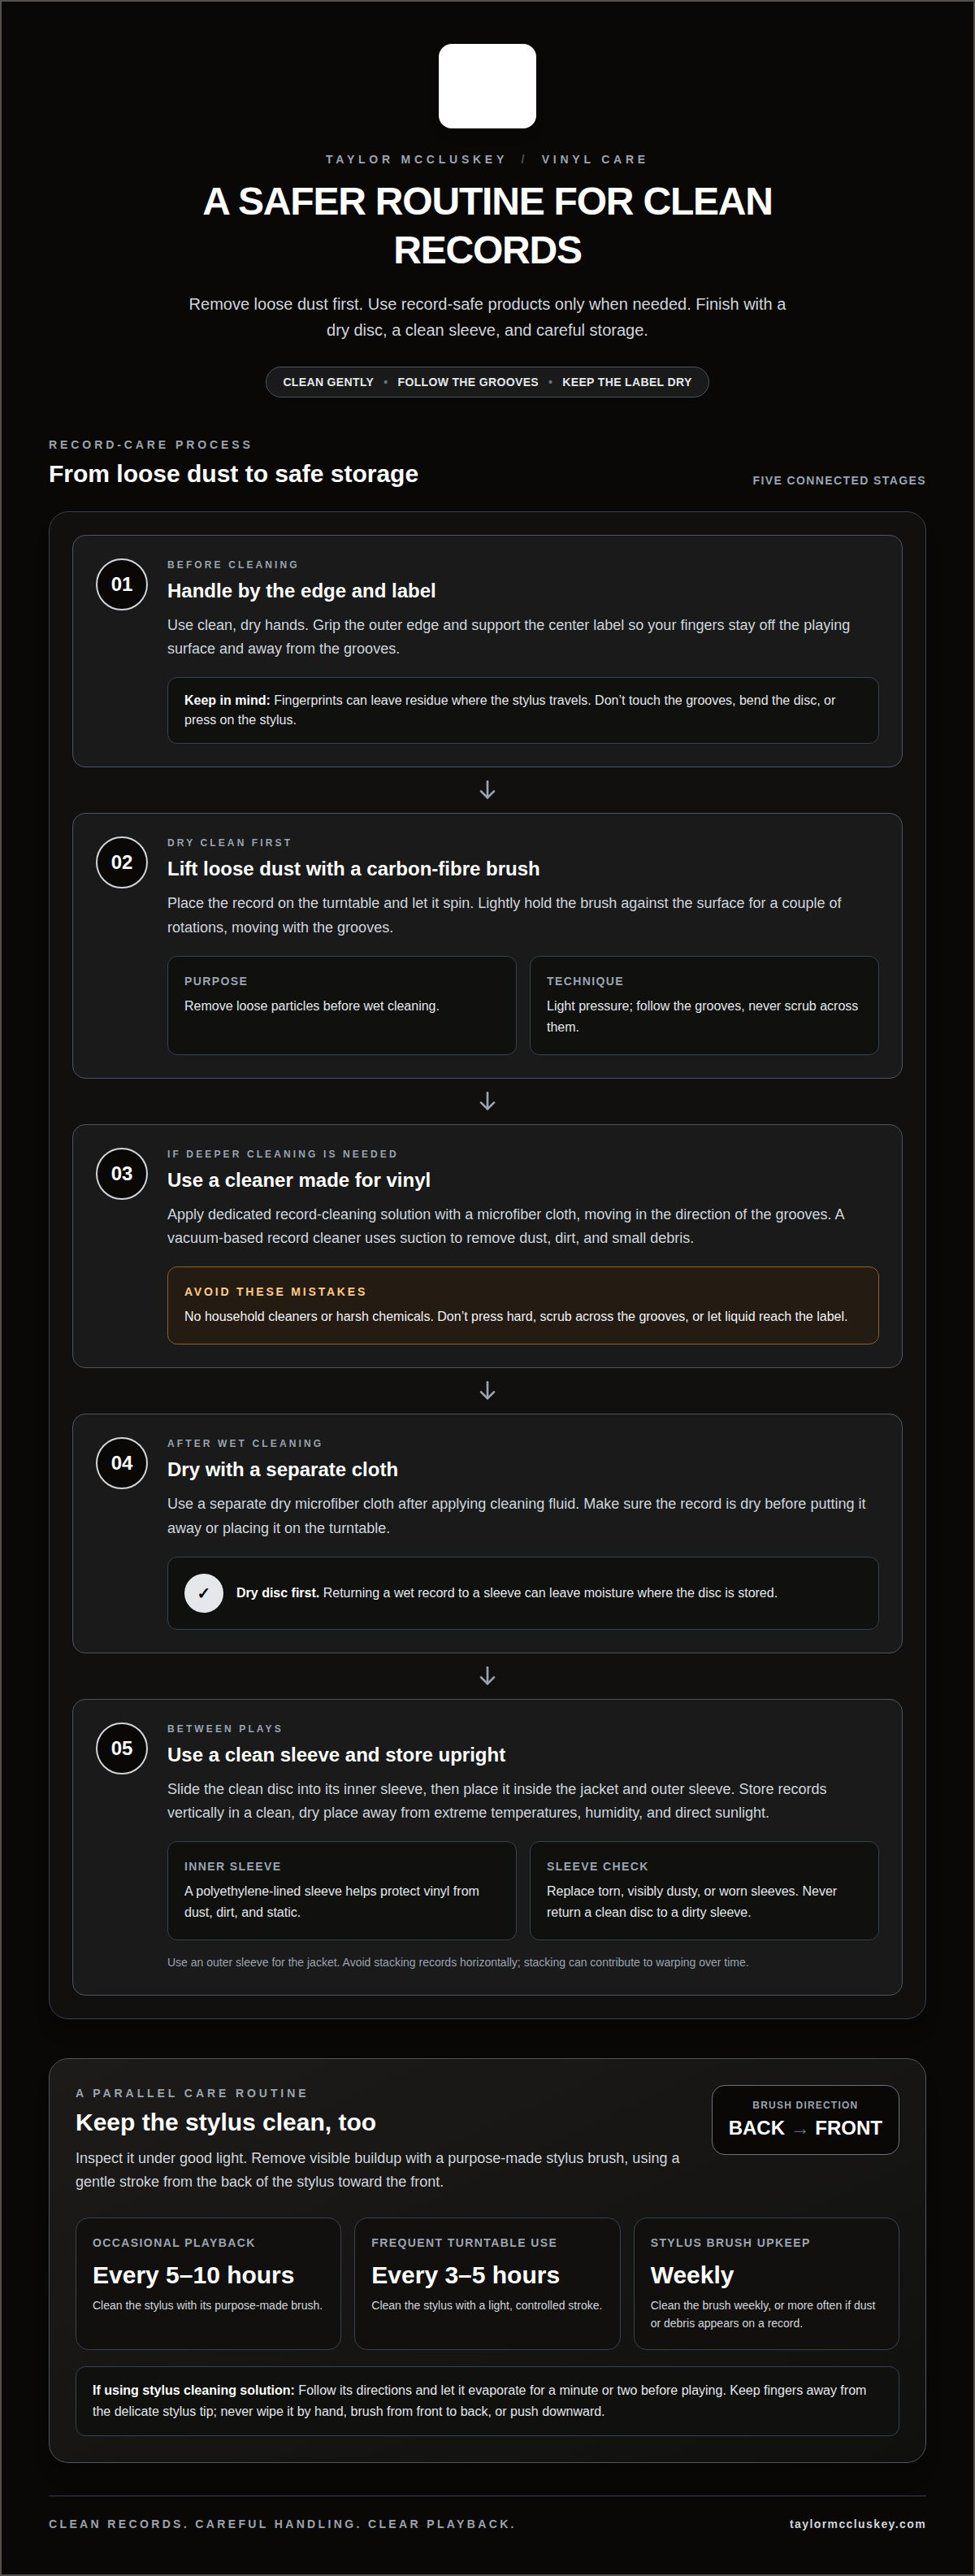
- Place the record on a turntable and let it spin. Lightly hold a carbon-fibre brush against the surface for a couple of rotations, following the grooves. This removes loose particles before wet cleaning and helps prevent dirt from being pushed into the grooves.
-
Replace Worn or Dusty Sleeves
Replace an inner sleeve if it’s torn, visibly dusty, or worn. A clean sleeve helps prevent debris from transferring onto a freshly cleaned record. Choose a polyethylene-lined sleeve to help protect vinyl from dust, dirt, and static. Paper sleeves with a poly lining pair a paper exterior with a protective inner surface. Don’t put a clean disc back into a dirty sleeve.
- Use an inner sleeve for the record and an outer sleeve for its jacket. Carefully slide the disc into its inner sleeve, then place it inside the jacket and outer sleeve. Store records vertically rather than stacking them horizontally, since stacking can contribute to warping over time. Keep them in a clean, dry place away from extreme temperatures and humidity.
-
Avoid Record-Cleaning Mistakes
Choose a cleaner made for vinyl, not a household product. Harsh chemicals can dull the surface and affect audio quality. Don’t scrub across the grooves or press hard with a cloth. Follow the grooves, keep liquid off the label, and use a separate dry microfiber cloth after applying cleaning fluid.
- For deeper cleaning, apply a dedicated record-cleaning solution with a microfiber cloth, moving in the direction of the grooves. Dry the record with a separate cloth. A vacuum-based record cleaner uses suction to remove dust, dirt, and small debris. A sound routine for how to properly care for and clean vinyl records also means returning each disc to a clean inner sleeve once it’s dry.
Handling records by the edges and label
Keep a steady grip whenever you remove a disc from its sleeve or place it on the turntable. Keeping your fingers clear of the playing surface limits the oils and debris transferred to the grooves.
-
Hold Records by the Center Label
Grip the outer edge with one hand and support the center label with your other fingers. This keeps your fingertips away from the grooves while controlling the record’s movement. Avoid touching the playing surface, even briefly, as fingerprints can leave residue where the stylus travels. Before lifting the disc, make sure your hands are clean and dry.
- Keep your grip on the edge when carrying a disc or moving it between a sleeve and turntable. Support it evenly rather than pinching one small area or bending it. Holding the edge and label helps prevent accidental contact with the surface and keeps the disc stable as you handle it.
-
Handle Records During Playback
Set the record flat on the platter before lowering the tonearm. When lifting the stylus, raise the tonearm gently and straight up. Don’t press down on the stylus or touch it with your fingers. Wait until the record stops moving before lifting it by the edge and label. These steps keep your hands clear of the grooves during playback.
- Remove a record from its cover horizontally, not vertically. Slide it out while supporting the edge and label, rather than pulling from one point or dragging the playing surface against the jacket. Use the same controlled movement when returning it, so the disc doesn’t scrape against the sleeve opening.
- After handling, return the disc to its inner sleeve and store it upright. Keep records away from extreme temperatures and direct sunlight to reduce the risk of warping. A stable environment also helps protect your collection between listening sessions.
Benefits of cleaning records and styluses
Clean records and a debris-free stylus help keep playback clear and your collection ready to enjoy. Make stylus care part of your listening routine, not just your record-cleaning sessions.
- Inspect the stylus under good light before playing a record. Dust and debris caught at its tip can interfere with its contact with the groove. Remove visible buildup with a purpose-made stylus brush. Keep your fingers away from the delicate tip, and never wipe it by hand.
- Move the stylus brush gently from the back of the stylus toward the front. Use a controlled stroke in the direction the stylus travels across a record. Don’t brush from front to back or push downward. A light touch removes dust without putting unnecessary pressure on the stylus assembly.
- Set a cleaning rhythm around your listening habits. For occasional playback, clean the stylus every 5-10 hours; for frequent turntable use, clean it every 3-5 hours. A stylus brush used regularly should be cleaned weekly, or more often if dust or debris appears on a record.
- Apply stylus cleaning solution only as directed, then let it evaporate for a minute or two before playing. This pause keeps liquid from reaching the record during playback. If you use a record-cleaning machine, make sure the disc is dry before placing it on the turntable.
- Keep records clean between plays by returning each disc to its inner sleeve after listening. Removing dust from the stylus and record limits debris during playback. Clean records also help the stylus meet the grooves without picking up loose particles from storage.
Approved record-cleaning products
Choose industry-approved cleaners designed for vinyl. Machine types differ: vacuum systems suction away applied fluid, while spin cleaners use diluted fluid to lift debris from grooves. Cost varies with the cleaning method, machine design, and included features.
- Read the cleaner’s label before applying it. Use a product specifically intended for vinyl records, not a general household spray. Harsh chemicals can dull the surface and affect sound quality. A record-safe cleaner helps avoid residue that could interfere with playback.
- Match the method to the record’s condition and your cleaning routine. A vacuum system holds the disc on a platter and removes applied solution with suction. Spin cleaning immerses the record in diluted cleaning fluid to loosen dust, dirt, and small debris from the grooves.
- Consider ultrasonic cleaning for records that need a deeper clean. Ultrasonic machines create millions of small bubbles in cleaning solution, helping dislodge particles from grooves. Follow the machine’s instructions and use a solution made for vinyl rather than assuming any liquid is suitable.
- Assess a machine by comparing its cleaning method, operation, and included components. Vacuum, spin, and ultrasonic systems work differently, so their prices can vary. Choose based on the records you clean and the process you can use consistently, rather than treating a higher price as proof of better cleaning.
- Keep static and scratches in mind while cleaning. Brush away surface dust before wet cleaning, then follow the grooves with light pressure. Distilled water is used in some record-cleaning mixtures, but a homemade mix is not automatically an approved product. Prefer a dedicated, industry-approved vinyl cleaner.
- Let the record dry fully before playing it or returning it to its sleeve. Store cleaned records vertically in clean inner sleeves, away from extreme temperatures. This helps keep fresh dust from settling on the surface and preserves the benefits of cleaning.
Taylor McCluskey: Music Albums and Singles
Taylor McCluskey’s Music Albums and Singles offer a next step for listeners who want to discover his work after caring for their collection. Explore the music at your own pace, then enjoy it on your turntable using the careful handling and cleaning habits covered here.
If you’re interested in experiencing the music live, Concert Tickets offer another way to connect with Taylor McCluskey’s work. Artist Merchandise is another way to show your support. Choose what suits how you enjoy music, whether listening at home or attending a performance.
For details on Taylor McCluskey’s music and other creative work, visit taylormccluskey.com.
Make Record Care Part of Your Listening Ritual
A well-kept collection invites you to return to the music, not just preserve it. Use each listening session to notice how your records sound and how your routine feels. If dust or playback noise appears, pause and assess the record, stylus, and cleaning method before playing again. Consistent care makes maintenance part of the experience.
Learning how to properly care for and clean vinyl records gives you a practical foundation, but your collection will also show you what needs attention. Keep your routine simple, use products intended for vinyl, and adjust your approach to suit each record’s condition. With time, thoughtful handling becomes second nature.
For questions about Taylor McCluskey’s creative work, contact Taylor McCluskey. Keep the music moving, one considered listen at a time.
Frequently Asked Questions
How Should Vinyl Be Stored: Flat or Upright?
Store records upright, rather than stacking them flat. A stack places pressure on lower discs and can contribute to warping over time. Keep them supported so they don’t lean sharply, and choose a clean, dry storage space away from direct sunlight. A storage environment around 65-70°F (18-21°C) and 40-50% humidity is recommended for vinyl records.
How often should I clean my stylus?
For occasional listening, clean the stylus every 5-10 hours of playback; for frequent use, clean it every 3-5 hours. Also inspect the tip when dust or debris appears on a record. Use a purpose-made stylus brush, and clean the brush weekly if you use it regularly. This keeps loose debris from building up between routine inspections.
Is manual cleaning effective?
Yes. Manual cleaning can remove surface dust and loosen grime when you use a record-safe fluid and a clean microfiber cloth. Work carefully and evenly, without pressing hard or wiping across the grooves. A lightly soiled disc may need only a dry brush, while a record with visible residue may benefit from a suitable wet-cleaning method.
Which Inner Sleeves Should I Use?
Choose an inner sleeve with a polyethylene lining to help shield a record from dust, dirt, and static. Paper sleeves with a poly lining combine a paper exterior with a protective inner surface. Replace a sleeve that is torn or visibly dusty, since debris inside it can transfer onto the disc. Protect the jacket with a separate outer sleeve.
What is the best way to clean vinyl records by hand?
First remove loose dust with a record brush. Then apply vinyl-record cleaning solution with a clean microfiber cloth, moving gently in the direction of the grooves. Use a separate dry cloth afterward and let the surface dry before playing. For hand-washing, use cleaning solution mixed with distilled water; avoid tap water, which can leave mineral deposits.
What supplies are safe for cleaning vinyl records?
Use a carbon-fibre or velvet record brush for dry dusting, a clean microfiber cloth for wiping, and a dedicated vinyl-cleaning solution for wet cleaning. Choose industry-approved products and follow their directions. Avoid household cleaners and rough cloths, which can harm the surface. Keep separate dry and damp cloths available so you don’t wipe residue and loosened dirt back across the record.


